
How to Adjust Door Closer Speed? Simple Step-by-Step Guide
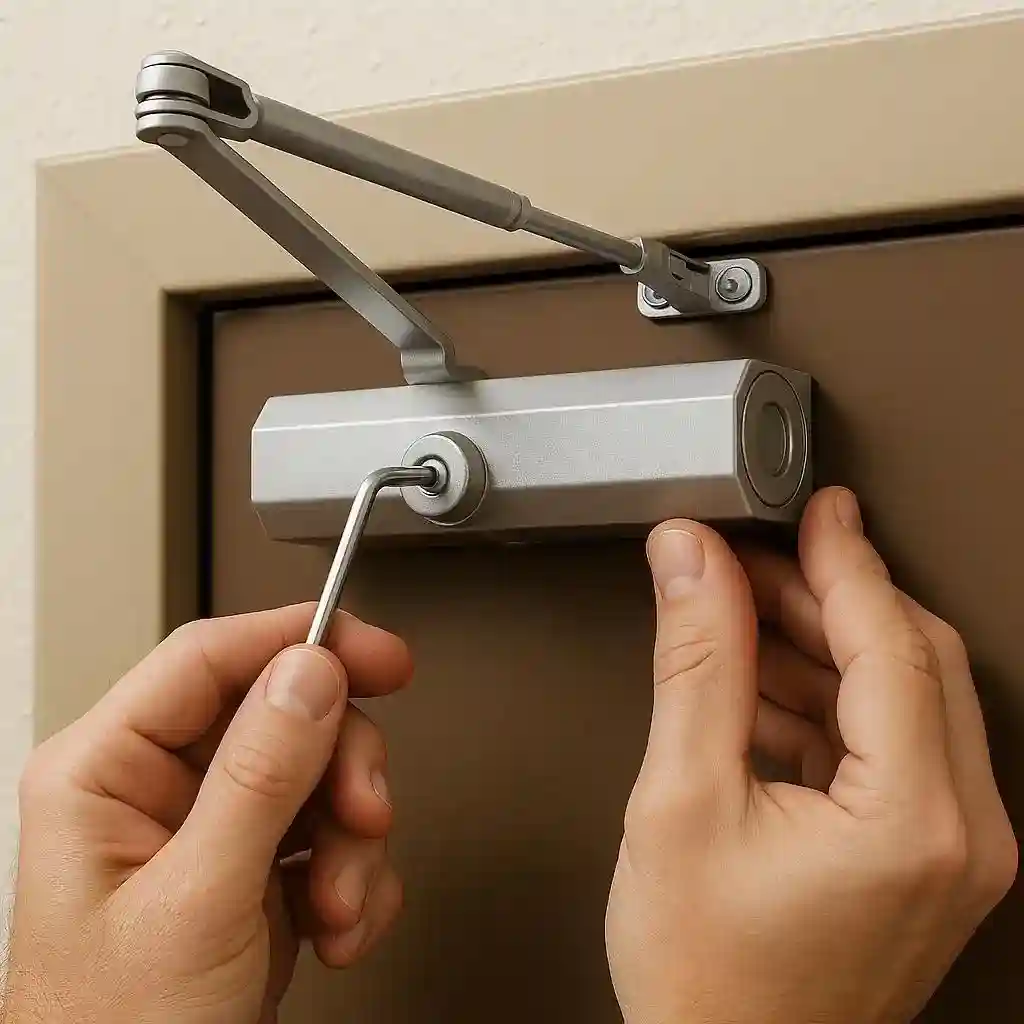
Table of Contant
- Introduction
- Common Door Closer Problems And Quick Fixes
- Common Mistakes To Avoid While Adjusting A Door Closer
- What is a Door Closer?
- How to Adjust Door Closer Speed (Step-by-Step)
- Clockwise Vs Counter – Clockwise Adjustment
- Door Closer Adjustment Screw 1 and 2 Explained
- Why Should You Adjust Door Closer Speed?
- How Does a Hydraulic Door Closer Works?
- When Should You Replace a Door Closer
- FAQ
- Conclusion
Introduction
If your door closes too fast, too slowly, or doesn’t shut properly, you don’t always need to replace the door closer. In many cases, the problem can be solved with a simple door closer speed adjustment.
Most hydraulic and automatic door closers are designed with adjustment screws that allow you to control the door’s closing speed and latching speed.
In this guide, you’ll learn how to adjust door closer speed, understand the purpose of each adjustment screw, fix common closing problems, and know when a door closer needs replacement instead of adjustment.
What Is a Door Closer?
A door closer is a mechanical device installed at the top of a door that automatically closes it after it has been opened. Instead of allowing the door to slam shut or remain open, the closer controls the movement and brings the door back to the closed position smoothly.
Most modern buildings use hydraulic door closers because they provide better control and durability. Inside the closer is a spring and hydraulic oil. When the door opens, the spring stores energy. As the door closes, hydraulic oil flows through small valves that control how fast or slow the door moves. This system makes the closing motion smooth, quiet, and safe.
Door closers are commonly used in homes, offices, hospitals, schools, hotels, shopping malls, and commercial buildings where doors are opened frequently.
Common Door Closer Problems and Quick Fixes
Even after adjusting the door closer speed, some problems may continue if there is an issue with the door, hinges, or closer body. Use the guide below to identify the most common problems.
🚪 Door Slams Shut
Why it happens: Sweep or latch speed is set too fast.
What to do: Turn the relevant speed adjustment screw clockwise by 1/8 turn, then test the door. Repeat gradually if needed.
🐢 Door Closes Too Slowly
Why it happens: The sweep speed is set too slow.
What to do: Turn the sweep adjustment screw slightly counter-clockwise and test the closing speed.
🔒 Door Does Not Latch Properly
Why it happens: The latch speed may be too slow, or the strike plate may be misaligned.
What to do: Increase the latch speed slightly and check whether the door and strike plate are properly aligned.
🛑 Door Stops Before Closing
Why it happens: Hinges may be tight, loose, rubbing, or something may be obstructing the door closer.
What to do: Check the hinges, weather stripping, and closer arm for anything causing resistance.
💪 Door Is Difficult to Open
Why it happens: The spring power may be set too high.
What to do: Check the manufacturer’s instructions before changing the spring-power setting.
💧 Hydraulic Oil Is Leaking
Why it happens: The internal seals of the door closer may be damaged.
What to do: Stop adjusting the valves. A leaking hydraulic door closer generally needs to be replaced.
Common Mistakes to Avoid While Adjusting a Door Closer
1. Don’t turn the adjustment screw more than one full turn. Over-adjusting can cause hydraulic oil leakage and may permanently damage the door closer.
2. Always make small adjustments of about 1/8 to 1/4 turn at a time. Small changes provide better control over the door closing speed and make it easier to find the correct setting.
3. After each adjustment, open and close the door several times. This helps you check whether the closing speed is smooth and whether the door latches properly.
4. If the adjustment screw feels tight, do not apply excessive force. Using too much pressure can damage the adjustment valve and affect the performance of the hydraulic door closer.
5. Before adjusting the door closer settings, make sure the door hinges, closer arm, and mounting screws are secure. Loose hardware can cause closing problems even when the door closer is correctly adjusted.
6. If you notice hydraulic oil leaking or visible damage to the door closer, adjusting the screws will not solve the problem. In this situation, replacing the door closer is usually the better option.
7. Always use the correct screwdriver or Allen key recommended for your door closer. Using the wrong tool can damage the adjustment screws and make future adjustments difficult.
How to Adjust Door Closer Speed (Step-by-Step)
Adjusting a hydraulic door closer is a simple task if you follow the correct steps. You only need a screwdriver or Allen key, depending on your door closer model.
Step 1: Find the Adjustment Screws
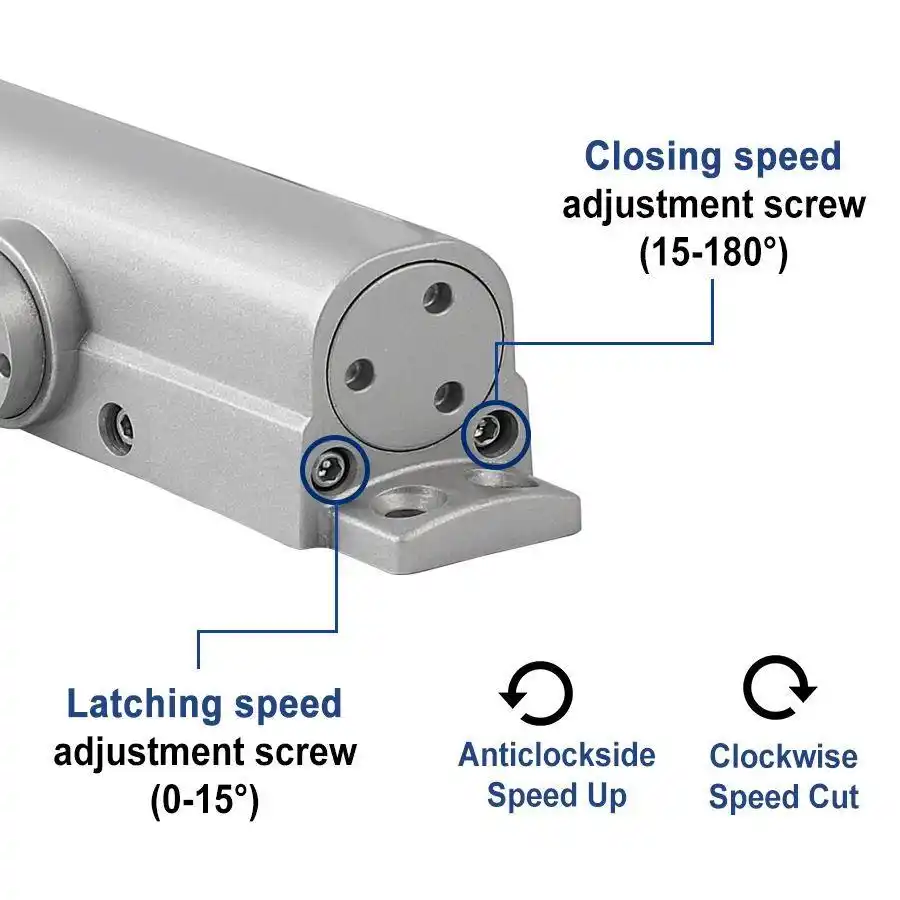
Locate the adjustment screws on the side or front of the door closer body. Most automatic door closers have two clearly marked screws for sweep speed and latch speed.
Make sure you identify the correct screw before making any changes.
Step 2: Test the Current Closing Speed
Open the door completely and let it close naturally. Watch how the door moves. Does it slam shut? Does it stop before closing? Or does it close very slowly? Testing the door first helps you know which adjustment is needed.
Step 3: Adjust the Sweep Speed
If the door closes too quickly during the main closing movement, turn Screw 1 clockwise slightly to reduce the speed. If the door is closing too slowly, turn the screw counter-clockwise to increase the speed.
Only turn the screw about one-eighth or one-quarter of a turn at a time.
Step 4: Adjust the Latch Speed
Now check the last part of the closing motion. If the door does not latch properly, adjust Screw 2. A small clockwise turn usually slows the latch speed, while a counter-clockwise turn increases it.
Make very small adjustments and test the door after each change.
Step 5: Test the Door Again
Open and close the door several times after every adjustment. The ideal door closer should close smoothly without slamming and should latch completely without extra force. If necessary, repeat the adjustment until the movement feels balanced.
Clockwise vs Counter-Clockwise Adjustment
Clockwise
Slows down the door closing speed
Reduces the flow of hydraulic oil
Best if the door is closing too fast
Turn only 1/8–1/4 at a time
Counter-Clockwise
Increases the door closing speed
Increases the flow of hydraulic oil
Best if the door is closing too slowly
Turn only 1/8–1/4 at a time
Door Closer Adjustment Screw 1 and 2 Explained
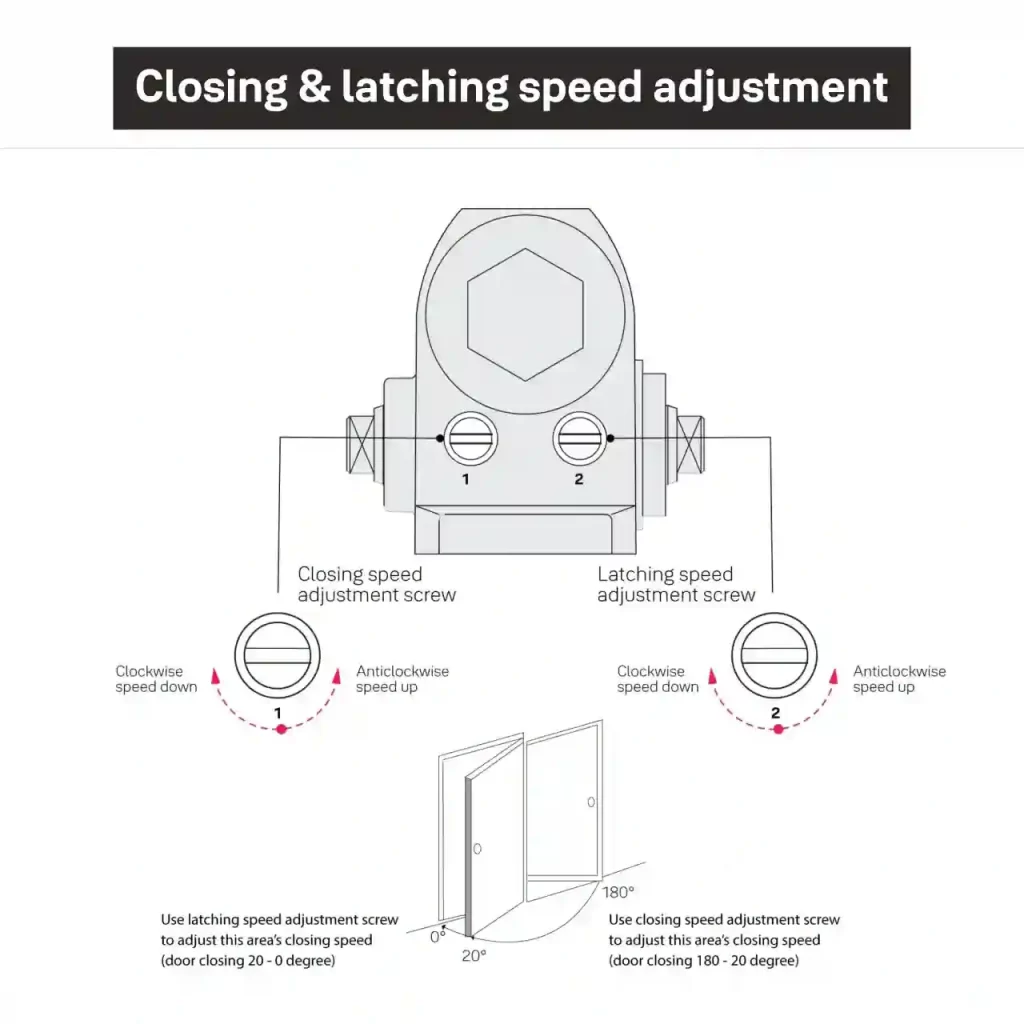
Before adjusting the door closer speed, it’s important to understand what each adjustment screw does. Most hydraulic door closers have two adjustment screws, commonly known as Screw 1 and Screw 2. Some premium models may also include a third screw for backcheck adjustment, but for most residential and commercial door closers, the first two screws are all you need.
Screw 1 controls the sweep speed, which is the main closing movement from the fully open position until the door is about 10–15 degrees away from closing. If the door moves too quickly during this stage, you can slow it down by adjusting Screw 1. If the door is moving too slowly, you can increase the speed with a small adjustment.
Screw 2 controls the latch speed. This is the final part of the closing motion where the door moves from the last few inches until it locks completely. If the latch speed is too slow, the door may not close all the way. If it is too fast, the door may slam into the frame and create unnecessary noise or damage.
Always remember that every door closer model is slightly different, so it’s a good idea to check the manufacturer’s instructions before making any adjustments.
Why Should You Adjust Door Closer Speed?
Over time, every hydraulic door closer experiences normal wear due to daily use. As a result, the door may begin closing too quickly, move too slowly, stop before latching, or make a loud slamming noise. These are signs that the closing speed needs adjustment.
A properly adjusted automatic door closer offers several benefits. It prevents the door from slamming, reduces pressure on the hinges and lock, extends the life of the door closer, improves security by ensuring the door closes completely, and creates a quieter environment.
Instead of replacing the closer immediately, adjusting the door closer settings is usually the first solution recommended by professionals.
.
How Does a Hydraulic Door Closer Work?
A hydraulic door closer uses both a spring and hydraulic oil to control the door’s closing movement.
When the door is opened, the internal spring compresses and stores energy.
As the door starts closing, the spring releases the stored energy to pull the door back.
At the same time, hydraulic oil flows through small adjustment valves inside the closer.
These adjustment valves regulate the oil flow, which controls the door’s closing speed.
A slower oil flow makes the door close more gently, while a faster oil flow increases the closing speed.
Turning the door closer adjustment screw changes the amount of oil flowing through the valves.
Even a small adjustment can make a noticeable difference, so always turn the screw gradually and test the door after each adjustment.
When Should You Replace a Door Closer?
Door closer speed adjustment can solve many closing issues, but it cannot fix a damaged hydraulic closer. You should consider replacing the door closer if you notice hydraulic oil leakage, a broken or bent closer arm, damaged adjustment screws, or a door that still fails to close after several careful adjustments.
A leaking door closer usually means the internal seals have failed. Once hydraulic oil escapes, the closer may no longer control the door closing speed correctly. Similarly, if the door closer body is loose, cracked, or making unusual noises, replacement is often safer than repair.
Before buying a replacement door closer, check the door weight, door width, mounting style, and whether it is used for a residential, commercial, or fire-rated door. Choosing the correct hydraulic door closer helps ensure smooth closing, reliable latching, and long-term performance.
Frequently Asked Questions
Which screw adjusts door closer speed?
Most hydraulic door closers have two adjustment screws. One controls the sweep speed, which manages the main closing movement, while the other controls the latch speed during the final few inches before the door closes.
How much should I turn a door closer adjustment screw?
Turn the adjustment screw only 1/8 to 1/4 turn at a time. Test the door after every small adjustment. Large turns can cause the door to close incorrectly or may damage the hydraulic valve.
Why is my door closer slamming shut?
A door usually slams when the sweep speed or latch speed is set too fast. Turn the appropriate speed control valve clockwise slightly, then open and close the door several times to check the result.
Why does my door not latch after adjustment?
The latch speed may be too slow, or the door may be misaligned with the strike plate. Increase the latch speed gradually and inspect the hinges, lock, and door frame for alignment problems.
Can I repair a leaking hydraulic door closer?
In most cases, a leaking hydraulic door closer should be replaced. Adjusting the door closer screws will not fix failed internal seals or lost hydraulic oil.
What is the difference between sweep speed and latch speed?
Sweep speed controls the door through most of its closing movement. Latch speed controls the final 10–15 degrees, helping the door close fully and engage the latch without slamming.
Conclusion
Knowing how to adjust door closer speed can help you fix a slamming door, a slow-closing door, or a door that does not latch properly. Always make small adjustments, test the door after each change, and check the manufacturer’s instructions for your specific door closer model. If the closer is leaking, damaged, or still not working correctly, replacing it is usually the best solution.

Leave a Reply