
How to Fix a Broken Wooden Door Panel?
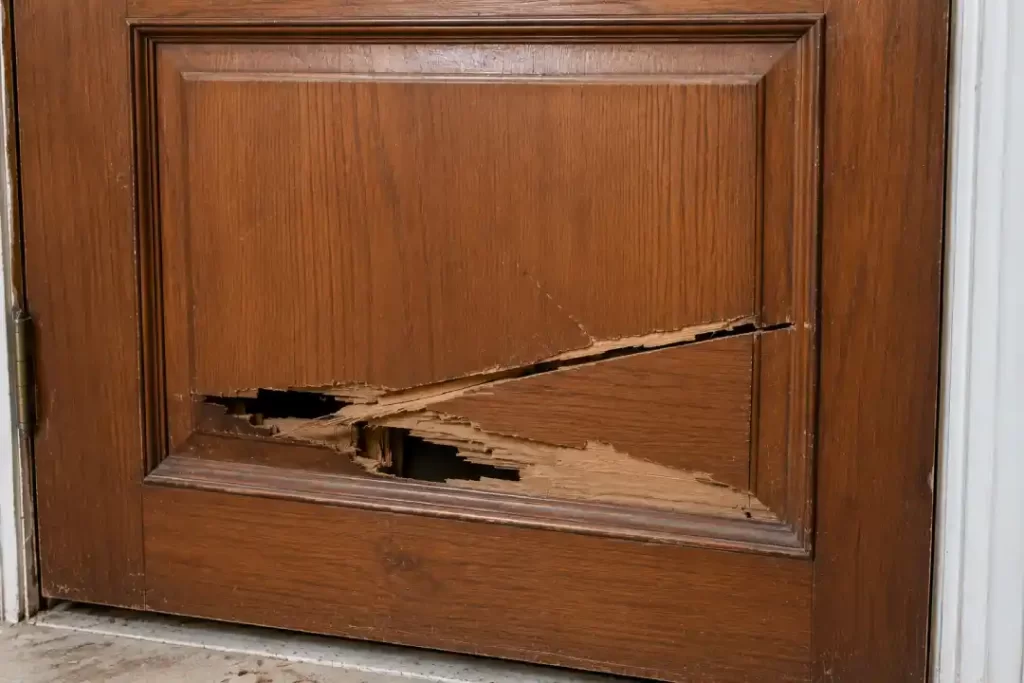
Table of Content
- Introduction
- Common Causes of Wooden Door Panel Damage
- Signs Your Wooden Door Panel Needs Repair
- Tools and Materials You’ll Need
- How to Fix a Broken Wooden Door Panel (Step-by-Step Guide)
- How to Repair a Split Wooden Door Panel
- How to Fix Water-Damaged Wooden Door Panels
- How to Repair Holes in a Wooden Door Panel
- Can You Repair a Hollow-Core Wooden Door?
- When Should You Repair vs. Replace the Door?
- Tips to Prevent Wooden Door Panel Damage
- Common Mistakes to Avoid
- Frequently Asked Questions (FAQs)
- Conclusion
Introduction
A broken wooden door panel doesn’t always mean you need a new door. Whether the panel has cracked, split, dented, or developed a hole, many types of damage can be repaired using basic woodworking tools and repair materials. Learning how to fix a broken wooden door panel can save money while extending the life of your door.
This guide explains the causes of wooden door damage, the tools you’ll need, step-by-step repair methods, and maintenance tips to prevent future problems.
Common Causes of Wooden Door Panel Damage
💧
Moisture
Excess moisture can seep into the wood, causing it to swell, warp, weaken, and eventually rot over time.
💥
Impact
Furniture collisions, accidental hits, or forceful door slams can cause wooden door panels to crack, dent, or split.
🐜
Termites
Hidden termite infestations eat away the wood from the inside, weakening the panel’s structure before visible damage appears.
⚒️
Improper Installation
Poor installation or incorrect fitting places unnecessary stress on the door panel, reducing its strength and lifespan
🕳️
Accidental Holes
Heavy impacts, misplaced hardware, or accidental drilling can leave holes that weaken the door panel.
🔩
Loose Joints
Loose or weakened joints reduce the panel’s stability, causing movement and increasing the risk of damage.
| 🔍 Sign | 📌 Why You Shouldn’t Ignore It |
|---|---|
| 🪵 Visible Cracks | Can spread over time and weaken the wooden door panel. |
| ✂️ Deep Scratches | Exposes bare wood to moisture and dirt. |
| ⚠️ Split Wood | Reduces the door’s strength and stability. |
| 🔧 Loose Panels | Indicates weak joints that require immediate repair. |
| 💧 Rotten Wood | A sign of moisture damage that can spread quickly. |
| 🕳️ Holes | Affect both appearance and structural durability. |
| 🎨 Peeling Paint | Leaves the wood vulnerable to weather damage. |
| 🌧️ Water Stains | Often point to hidden moisture inside the panel. |
| 📐 Warping | Causes poor alignment and difficult door operation. |
| 📏 Uneven Surface | May indicate hidden internal damage. |
Pro Tip: The sooner you repair these issues, the easier and cheaper your wooden door panel repair will be. Regular maintenance helps your door stay strong, secure, and looking like new.
Tools and Materials You'll Need
Before you begin repairing your broken wooden door panel, gather the following tools and materials to make the repair process easier and more efficient.
🛠️ Tools You’ll Need
For a wooden door repair, keep a putty knife, hammer, chisel, clamps, and paint scraper handy. These tools help with applying filler, removing damaged wood, securing repaired pieces, and cleaning old paint or loose material.
🧰 Repair Materials
You’ll need wood filler for small cracks, dents, and holes, while wood glue is useful for bonding broken wooden parts. For deeper cracks or missing sections, wood epoxy provides a stronger repair. Keep primer and paint or wood stain ready to give the repaired door a smooth and finished look.
🪵 Sanding & Surface Preparation
Use 120, 180, and 220-grit sandpaper to gradually smooth the repaired area before painting or staining. After sanding, wipe the surface with a clean cloth to remove dust and debris.
🦺 Safety Equipment
For safety, wear protective gloves while handling tools and damaged wood. A dust mask is also recommended when sanding to reduce the amount of wood dust you breathe in.
Step-by-Step Guide to Fix a Broken Wooden Door Panel
🟢 Stage 1 — Prepare the Door
Before starting the repair, remove the door from its hinges and place it on a flat, stable surface. This makes the damaged area easier to access and work on safely.
Next, clean the door thoroughly. Remove dust, dirt, loose paint, wood splinters, and old filler using a paint scraper and clean cloth.
Finally, inspect the damaged area carefully. Check whether the door has cracks, dents, holes, rotten wood, or broken sections. Identifying the type of damage first will help you choose the right repair method.
🟠 Stage 2 — Repair the Damage
The repair method depends on how badly the wooden door is damaged.
For hairline or small cracks, apply wood glue into the crack and press the area together. Use clamps to hold the wood firmly in place while the glue dries.
For small holes and dents, apply wood filler or wood putty and spread it evenly with a putty knife. Let it dry completely before sanding.
For large broken sections, carefully reposition the broken piece and secure it with wood glue. If a section of wood is completely missing, use a two-part wood epoxy to rebuild the damaged area.
🔵 Stage 3 — Smooth the Repaired Surface
Once the filler, glue, or epoxy has completely dried, sand the repaired area to create a smooth and even surface.
Start with 120-grit sandpaper to remove excess filler and rough edges. Then move to 180-grit sandpaper to smooth the surface further. Finally, use 220-grit sandpaper to create a fine, paint-ready finish.
After sanding, wipe the door with a clean, dry cloth to remove all remaining dust.
Pro Tip: Always sand in the direction of the wood grain. This helps create a smoother finish and reduces visible scratches.
🟣 Stage 4 — Apply the Final Finish
After the repaired area is smooth and clean, apply a wood primer over the repaired section. Primer helps seal the surface and improves paint adhesion.
Once the primer has dried, apply paint or wood stain that matches the existing door finish. Depending on the condition of the door, you may need more than one coat for an even appearance.
Finally, apply a protective sealer if required. It adds an extra layer of protection against moisture, scratches, and everyday wear.
Allow the final coating to dry completely before reinstalling and using the door.
How to Repair a Split Wooden Door Panel
Step Action
① Inject wood glue into the split.
② Clamp the panel firmly.
③ Remove excess glue.
④ Leave it to dry overnight.
⑤ Sand the surface and refinish it.
Repairing Water-Damaged Wooden Door Panels
START
│
▼
🪵 Remove Rotten Wood
│
▼
🌬️ Dry the Door Completely
│
▼
🧴 Strengthen with Wood Hardener
│
▼
🪹 Fill Cracks & Gaps
│
▼
🪚 Smooth the Surface
│
▼
🎨 Apply Moisture-Resistant Paint
│
▼
✅ Door Protected & Restored
Repairing a Hole in a Wooden Door Panel
🕳️ Hole in Door Panel
│
▼
🧹 Clean the Damaged Area
│
▼
🧩 Apply a Repair Patch (if needed)
│
▼
🪵 Fill the Hole with Wood Filler
│
▼
⏳ Allow It to Dry Completely
│
▼
🪚 Sand Until Smooth
│
▼
🎨 Prime & Paint to Match the Door
│
▼
✅ Repair Complete
Can You Repair Hollow Wooden Door Panels?
✅ Yes, You Can Repair Minor Damage
Hollow-core wooden door panels can often be repaired if the damage is small to moderate.
🔧 Recommended Repair Process
✔ Fill the hollow section with expanding foam for internal support.
✔ Cover the damaged area using a repair patch.
✔ Apply wood filler to create a smooth surface.
✔ Sand the repaired area until it is level.
✔ Finish with primer and paint to match the original door.
When Should You Replace Instead of Repair?
Replace the door if:
1. The panel is severely warped.
2. Rot covers a large area.
3.Termites have weakened the structure.
4.Multiple panels are broken.
5.Repair costs exceed replacement value.
Tips to Prevent Wooden Door Damage
Proper maintenance extends the life of wooden doors.
- Inspect doors every few months.
- Repaint when needed.
- Keep moisture away.
- Lubricate hinges.
- Tighten loose hardware.
- Avoid slamming the door.
- Seal exposed wood.
🚫 Mistakes That Can Ruin Your Door Repair
Before you start repairing your wooden door panel, make sure you avoid these common mistakes.
❌ Overfilling with Wood Filler
Too much filler creates an uneven surface and makes sanding more difficult.
❌ Skipping Sanding
Without proper sanding, the repaired area won’t blend smoothly with the rest of the door.
❌ Painting Too Early
Applying paint before the filler dries can lead to peeling, cracking, and poor adhesion.
❌ Forgetting to Use Clamps
Glued sections need firm pressure to create a strong, long-lasting bond.
❌ Ignoring Moisture Damage
Repairing the surface without fixing moisture issues often results in recurring damage.
❌ Choosing the Wrong Repair Products
Using low-quality or unsuitable materials can weaken the repair and shorten its lifespan.
Frequently Asked Questions
Can wood filler repair a broken door panel?
Yes. Wood filler works well for minor cracks, dents, and small holes.
Is wood glue strong enough?
For clean breaks, high-quality wood glue creates a durable bond that is often stronger than the surrounding wood.
Can I repair a hollow-core door?
Yes, but only if the damage is minor. Large holes or structural damage usually require replacement.
How long does wood filler take to dry?
Most wood fillers dry within 30 minutes to 2 hours, but always follow the manufacturer’s instructions.
Should I paint after repairing?
Yes. Priming and painting protect the repaired area and help it blend with the rest of the door.
Conclusion
Repairing a broken wooden door panel is a practical DIY project that can restore both appearance and functionality. Whether you’re fixing small cracks, filling holes, or
repairing split wood, using the right tools and techniques can produce long-lasting results. Regular maintenance and prompt repairs will help keep your wooden doors looking great and performing well for years.


Leave a Reply